Vermiculture/ Vermicomposting
Vermiculture, also known as worm farming or worm composting, is a sustainable and environmentally friendly method of recycling organic waste using red worms. By harnessing the natural decomposition abilities of worms, vermiculture transforms food scraps, yard trimmings, and other organic materials into a product that is more concentrated and powerful than ordinary compost. This product, known as worm castings, is added to soil to enrich its fertility and support plant growth.
Worm castings are known as “black gold” because they are the richest natural fertilizer known to us. As little as a tablespoon of pure worm castings provides enough organic plant nutrients to feed a 6" potted plant for more than two months. Worm castings stimulate plant growth more than any other natural product. Worm castings are rich in micronutrients, and contain iron, sulfur, magnesium, zinc, copper and calcium. They also provide macronutrients and have a nitrogen, phosphorus and potassium (NPK) ratio of 1-0-0 to 5-5-3.When purchased in stores, castings are very expensive, and, as with many other natural resources, they are easy to produce in almost any circumstances.

Vermiculture uses a special kind of worm called red wiggler (Eisenia fetida, known as various common names such as manure worm, redworm, brandling worm, panfish worm, trout worm, tiger worm, red wiggler worm, etc.,) It’s in the nature of the red wiggler to live in shallow soil depth, unlike the wild variety of worm, Lumbricus terrestris that can dig down to 6.5 feet.
There are a variety of ways to raise red wiggler worms, and each method has its pros and cons. We have chosen to use a worm box with multi-trays. The tray systems use the worms’ natural food-seeking tendency, encouraging them to move up and away from their finished castings. This solves the most difficult task of raising worms, namely, to separate them from the product that we want: their castings. Other ways to raise worms are directly in the ground, or in single tubs.
How to set up a tray worm bin
Steps
-
Set the one empty tray on the bottom section that has legs.
-
Add 4-5 page sheet of newspaper in the bottom of the tray.
-
Add your clean kitchen scraps. A small amount (2 cups) is fine at first. It will take a few weeks before the worms are established and start to eat at a normal rate.
-
For our brown additive, we prefer ground coconut fiber, called coir (rhymes with lawyer) but you can use dried, crumbled leaves, some shredded paper, or fine brown product from the chipper. Use the same proportions you would for building compost 60/40 -75/25 brown/green of the carbon/nitrogen mix. In other words, put in three times as much brown as green. (Worms don’t actually eat the food; they eat the bacteria that is produced as the carbon/nitrogen mix is breaking down.)
-
Add worms (found at local nurseries or on online.)
-
Gently sprinkle water on the mix. The amount depends on how wet your other ingredients are. Any excess water will go out the bottom of the legged frame and through the nozzle to the outside tray (if the nozzle is open)
-
Add a 4–5-page layer of newspaper on top and keep it moist.
-
Add food and coir every few days. Watch for flies or smells: this is a sign that you need to add brown.
Adding trays
As you continue to add brown and greens to the trays, they will fill up. When the contents are around ¾ inch from the top, set an empty tray on top and start the process again. Skip the newspaper layer on the upper trays, so that the worms can easily move through the holes and into the new trays to feed on the new brown / green mix. (see video)
It’s great to have more than two trays but see what works for you.
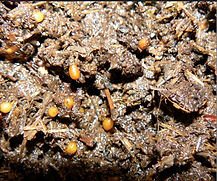
When the top tray is filled up, your bottom tray should be all worm casting with hardly any worms in it. Store the worm castings in a closed container and use for seed mixes, and to feed indoor and outdoor plants. There will be a lot of worm eggs (they look like grape seeds) along with the castings, so don’t be surprised if you see worms everywhere you use castings.
Worms are easy to raise as they are hardy and resilient. They like cool, dark, wet conditions so place them in a shady spot that never gets direct sun, and keep your top working layer moistened.
Here are some general tips:
-
Make sure that only worms live in the trays. Take extra measures to be sure that ants, flies or other creatures haven’t set up shop in competition with the worms.
-
Only use fresh greens for the worms, and don’t use anything that may have possibly been left out too long and have insects in it. We keep our worm food in the refrigerator until we are ready to feed them
-
Don’t overfeed them. Make sure that the previous food is mostly gone before adding more.


Adding trays
As you continue to add brown and greens to the trays, they will fill up. When the contents are around ¾ inch from the top, set an empty tray on top and start the process again. Skip the newspaper layer on the upper trays, so that the worms can easily move through the holes and into the new trays to feed on the new brown / green mix. (see video)
It’s great to have more than two trays but see what works for you.
When the top tray is filled up, your bottom tray should be all worm casting with hardly any worms in it. Store the worm castings in a closed container and use for seed mixes, and to feed indoor and outdoor plants. There will be a lot of worm eggs (they look like grape seeds) along with the castings, so don’t be surprised if you see worms everywhere you use castings.
Worms are easy to raise as they are hardy and resilient. They like cool, dark, wet conditions so place them in a shady spot that never gets direct sun, and keep your top working layer moistened.
Here are some general tips:
-
Make sure that only worms live in the trays. Take extra measures to be sure that ants, flies or other creatures haven’t set up shop in competition with the worms.
-
Only use fresh greens for the worms, and don’t use anything that may have possibly been left out too long and have insects in it. We keep our worm food in the refrigerator until we are ready to feed them
-
Don’t overfeed them. Make sure that the previous food is mostly gone before adding more.

Vermicomposting: How to Start a New Tray
Vermicomposting Troubleshooting