
Bokashi Compost System
Bokashi is an anaerobic (no air) process that ferments, rather than decomposes, your food waste. This creates a soil- enriching amendment. It is different from traditional composting methods and has some advantages over them.
The advantages of using the Bokashi method are:
-
Meat, bones and dairy products can be discarded into the bucket. This is not recommended in other composting system because of the possibility of attracting rodents.
-
The bucket can be stored inside with little smell
-
A 5 gallon bucket can accommodate a months worth of kitchen waste
-
The bokashi process introduces many types of beneficial organisms into the soil.
-
All nutrients enter the soil food web
Materials
5 gallon bucket with a tight fitting lid and
Bokashi bran.
We like the bokashi method because the daily/weekly disposal of kitchen waste is a simple, easy and efficient process, plus it avoids the complications of food scraps breaking down on your kitchen counter before you can get them to your compost pile. We keep the 5 gallon bucket right on the kitchen floor, because it’s tightly sealed, there is no smell except sometimes when you open it to add the new scraps every day or so.
Materials
-
Small container for scraps on your counter (large enough for a few days worth of scraps, but small enough to fit in your fridge)
-
Large containers (5 gallon buckets) with tight fitting (Gamma) lids.
-
We have 3 buckets that we rotate through, which works well for us.
-
Bokashi bran (you can make your own , and if you have access to waste products from beer making, etc, this is a huge bonus)
-
Masking tape and marker


Process
Step 1
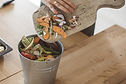
Collect food scraps for one or more days (dependent on season and temperature in your kitchen and presence of critters (fruit flies, roaches, ants)
Step 2
It’s important not to open your 5 gallon bucket more than once a day because of the anaerobic nature of the process.,
Step 3
Sprinkle a couple tablespoons of bran on the bottom of the bucket the first time you add scraps and on top of the each layer of scraps you deposit. Add about 1-2" of scraps each time.
Step 4
Add the food scraps to the bucket, add a couple more tablespoons of bran on top of the scraps and press down firmly to eliminate the air. (We use a kitchen-size plastic bag to press but you could use dinner plate or newspaper.)
Step 5
It usually takes a month for us to fill up the 5 gallon bucket. When the bucket is within an inch of the top, remove the plastic bag and close the lid. (WARNING -disaster will occur if you overfill the bucket!!!)
Step 6
Label the bucket with the fill date. We use masking tape and a pen or marker
to label the date that the bucket was filled so we can keep track of the oldest one. We usually have at least two buckets waiting to be buried or used for adding to the compost pile.
Step 7
Store the filled and labeled bucket in a shady spot for at least 2 weeks or longer if you have put in animal products.
Step 8
After the filled bucket sits and ferments for the appropriate time, choose a place to bury the contents. Our property is the typical clay soil of the region, so this is one of the ways we’ve been a really helpful process for transforming our property into a fertile oasis. We also use bokasi at this stage to add to our compost pile. It acts to heat the pile up quickly!
Step 9
Caution is required at this newly -buried stage, the contents are highly acidic and will now begin to decompose and reduce in size. Bury a few feet away from any established plants, after a few weeks, this will be a super fertile place to plant something!